Verifone VX675 mobile card machine (Elavon)
-
-
Mobile card machine with SIM card & GPRS connection
-
Take card payments on the road or anywhere with mobile network
-
Ideal for mobile businesses or traders without access to a permanent connection point
-
Get Started
What's in the box?
Ensure you have the following items:
- 1x VX675 Verifone card machine
- 1x SIM card (integrated)
- 1x till roll (installed)
- 1x power cord
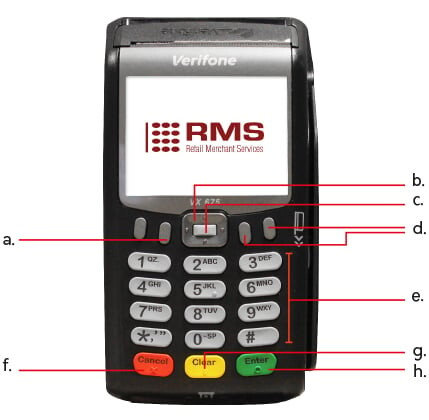
Function & menu keys
a. Paper feed - Test the feeding of the till roll through the printer.
b. Directional button - Scroll up and down through application menus.
c. Alpha button - Enter application menus.
d. Function keys - Scroll up and down through application menus.
e. Number keys - Type in numbers (for transaction values) and letters.
f. Cancel - Exit menus and cancel transactions. Delete entire values when entering numbers or letters.
g. Clear - Delete one character at a time when entering numbers or letters.
h. Enter - Enter application menus. Confirm values typed into the terminal.
Connecting & Setup
The VX675 terminal will be fully configured on arrival, with a SIM card included.
1. Power on the terminal by holding down ENTER.
Note: Your terminal should arrive with a charged battery. However, if it’s running low, plug the power cord into the slot located on the left-hand side of the terminal and plug into a power source.
Caution: We advise you to not leave your terminal on charge overnight, as this may damage the battery.
2. Allow time for the terminal to power up (approx. 60 seconds) and the Main Menu screen will appear. You will see a list of 4 options:
- Sale, Refund, Batch, Void
3. The terminal will connect to a mobile GPRS network automatically. When this is complete, the network symbol will turn blue.
Note: If your terminal fails to connect, the network symbol will have a red cross through it. If this happens, please contact our Customer Support team.
4. As part of your terminal setup, you will need to run a test transaction. Make a £0.01 transaction on your personal card to ensure the setup has been successful. Follow the steps in Sale Transaction to do this.
Note: This test transaction must be made by inserting your card and entering your PIN, not a contactless transaction.
Sale transaction (including contactless)
1. A sale may be initiated from the Main Menu screen, where you will see 4 options listed:
- Sale, Refund, Batch, Void
2. Using the number keys, type in the transaction value and press ENTER.
3. A prompt will appear to confirm the transaction amount. Press ENTER to confirm or CANCEL to cancel the transaction.
4. Follow the terminal prompts to Insert/Swipe/Present the customer’s card.
Note: Your customer may only present their card as a means of contactless payment if the transaction value is below the maximum contactless payment limit.
5. Insert/Swipe/Present the customer’s card using the terminal or alternatively key in the card number on the terminal. The customer must enter their PIN code if requested.
Important: Never ask the customer to divulge their PIN. The terminal will now contact the acquirer for authorisation.
6. If the transaction is authorised then an Approved message will be displayed and an Auth No will be printed on the receipt.
7. The terminal will print two receipts. The Merchant Copy will be printed first, tear this off then press ENTER. The Customer Copy will then be printed.
Refund transaction
1. A refund may be initiated from the Main Menu screen, where you will see 4 options listed:
- Sale, Refund, Batch, Void
2. Use the directional button to scroll down to Refund and press ENTER .
3. Using the number keys, type in the transaction amount and press ENTER .
4. Insert the customer’s card using the terminal or alternatively key in the card number on the terminal. The customer must enter their PIN code if requested.
Important: Never ask the customer to divulge their PIN. The terminal will now reach the acquirer for authorisation.
5. If the refund is authorised then an Approval message will be displayed.
6. The terminal will print two receipts. The Merchant Copy will be printed first, which the customer must sign.
7. A prompt will also appear on screen asking to validate the signature. Press ENTER to accept or CANCEL to decline .
8. The Customer Copy will then be printed.
Customer not present (CNP) transaction
A payment made where the cardholder does not, or physically cannot, present their card to you at the time of purchase.
1. A CNP transaction may be initiated from the Main Menu screen, where you will see 4 options listed:
- Sale, Refund, Batch, Void
2. Use the directional button to scroll down to Sale and press ENTER .
3. Using the number keys, enter the sale amount and press ENTER .
4. A prompt will appear to confirm the sale amount. Select yes by pressing ENTER or no by pressing CANCEL .
5. When prompted to Insert/Swipe/Present the customer’s card, key in the customer’s card number using the number keys and press ENTER.
6. Enter the expiration date (MM/YY) and press ENTER.
7. When prompted ‘Is customer present’, select the no symbol or press CANCEL.
8. You will see 4 options listed alongside the question: CVV2 NUMBER IS;
- Not present, Present, Illegible, Absent
9. Select the Present option and key in the customer’s CVV2 number (this is the 3 digits on the back of the card). Once confirmed, press ENTER.
10. Key in the customer's address. This will only be the house / flat number included in the 1st line of the address. If the customer doesn’t have a house / flat number, you will just press ENTER to continue.
11. Key in the customer’s postcode. You can only enter the numbers of the postcode in order of how the postcode reads:
E.g. if the postcode is 'MK9 1NJ', you would enter '91'. Then press ENTER. If the customer doesn’t have a Post Code, then you can press ENTER to continue.
If your business takes a lot of CNP transactions, you may find a Virtual Terminal to be a more useful method of taking payment.
End of day report
Important: Your End of Day Report should be performed every day as this is your confirmation of the transaction totals that have been sent to the acquirer.
1. On the Main Menu screen, use the directional button to scroll down to Batch and press ENTER.
2. Press ENTER to select the End of Day banking reports.
3. You will be asked to enter your user password.
Note: Unless this has been reset by a member of our Customer Support team, the pre-set password will be ‘1234’.
4. Type this in using the number keys and then press ENTER.
5. Your transactions for the day will be listed and a prompt will appear to confirm if the totals are correct. Select yes by pressing ENTER or no by pressing CANCEL. Your End of Day Report will then be printed.
Batching timescales
Once you’ve completed your End of Day banking report, it will be sent to the acquiring bank to be processed and paid into your bank account. The settlement timescales are as follows:
Standard settlement
2-3 working days
Same Day Settlement
Batch Time
11.01 pm - 4.00 am
4.01 am - 3.00 pm
3.01 pm - 11.00 pm
Funds Received
Before 11.00 am start of business
Before 7.00 pm same day
Before 11.00 am next day
If you would like Same Day Settlement added to your account or are unsure if you have it, please contact our Customer Support team.
Auto end of day report
Also known as ‘auto-batching’, this enables your card machine to bank the transactions listed on your End of Day report at a set time each day. You can choose a specific hour in the day when this is performed e.g. 17.00-18.00 daily.
The batching timescales for receiving funds are the same as if you ran your End of Day report manually:
Standard settlement
2-3 working days
Same Day Settlement
Batch Time
11.01 pm - 4.00 am
4.01 am - 3.00 pm
3.01 pm - 11.00 pm
Funds Received
Before 11.00 am start of business
Before 7.00 pm same day
Before 11.00 am next day
Your card machine will not be pre-programmed with this function but setup can be requested by contacting our Customer Support team.
Audit report
Print out a report of the completed transactions (sales, refunds & voids) on the card machine since your last End-of-Day report, without banking the totals.
1. From the Main Menu screen, using the directional button, scroll down to Reports and press ENTER.
2. Using the number keys enter your user password and then press ENTER.
Note: Unless this has been reset by a member of our Customer Support team, the pre-set password will be ‘1234’.
3. On selecting Audit, your audit report will print out.
Switch GPRS network
The VX675 can roam freely and be used anywhere with mobile network coverage.
On occasion, you may travel to an area with poor signal or a temperamental connection. In this case, you may need to switch to a network with stronger signal.
1. Use the directional button to scroll down until you reach the Terminal option. Press ENTER.
2. Scroll down again and select Media.
3. Using the number keys enter your user password and then press ENTER.
Note: Unless this has been reset by a member of our Customer Support team, the pre-set password will be ‘1234’.
4. Select GPRS and press ENTER. The config will begin to load and prompt the following options:
- Network: 02 (For example)
- Automatic: On
- Edit GPRS Network?
5. Press ENTER for yes to continue to GPRS Network Provider Automatic Registration (which means networks will be scanned automatically and switched if the signal is weak) or press CANCEL to manually select a different network.
6. All available options will be listed. Select a network and press ENTER. If successful, you will get a confirmation message.
Note: This process can be repeated as many times as required to get the best signal in your location.
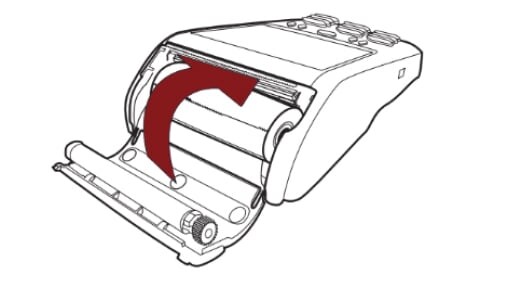
Replacing the paper roll
1. Holding the terminal, gently pull the latch located on the top of the terminal towards you to unlock the paper roll cover.
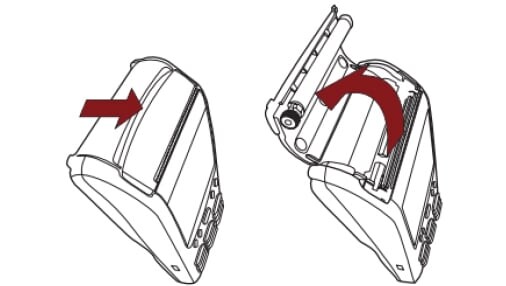
2. Lift the printer cover and remove any partial roll of paper in the printer.
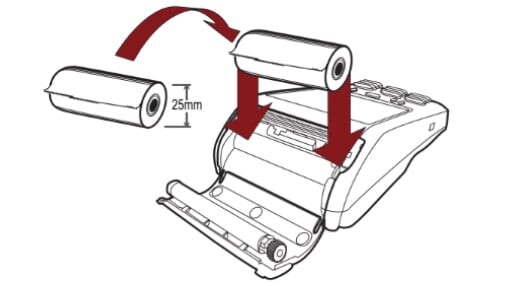
3. Loosen the glued leading edge of the paper or remove the protective strip from the new roll of paper.
4. Unwind the paper roll past any glue residue.
5. Hold the roll so that the paper feeds from the bottom of the roll and towards you.
6. Drop the paper roll into the printer tray.
7. Pull the paper up past the glue residue on the paper roll.
8. Close the paper roll cover by gently pressing directly on the cover until it clicks shut. Allow a small amount of paper past the glue residue to extend outside of the printer cover.
9. Tear the paper off against the serrated plastic strip in the printer. Press the paper feed button to test the paper is feeding correctly.
Customer support
If you have any questions regarding your terminal, please get in contact with our team of experts below:
For authorisation issues outside of our working hours call the Elavon Authorisation Line on:
0345 850 0197 (UK)
1850 303 130 (ROI)
Flexible payment solutions for small businesses