Verifone V240m Setup Guide (+Elavon)
Quick start guide to setting up and installing the Verifone V240m card machine. Includes performing basic functions such as making a sale, refund, contactless payment & completing your end of day report.
Get Started
What's in the box?
Ensure you have the following items included with your terminal:
-
1x Verifone V240m card machine
-
1x power cord
-
1x SIM card (integrated)
-
2x till rolls
-
1x base unit
This will be a full-feature base for Bluetooth models and a standard charging base for Wi-Fi and GPRS models.
You may also need the following information:
Merchant ID Number
This is the “MID NUMBER” that you can find on any Retail Merchant Services correspondence or email communication.
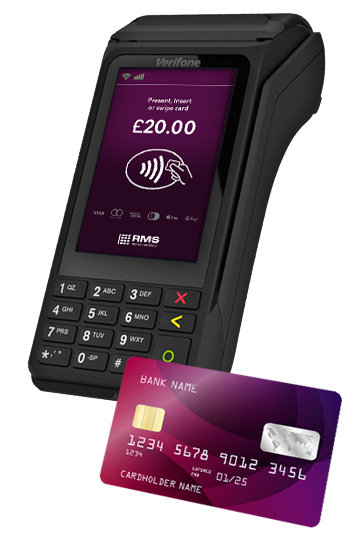
Keypad & buttons
a. 3.5" touch screen display - 320 x 480 pixel, HVGA capacitive touch screen, Corning® Gorilla® Glass 3 technology.
b. Number & letter keys - For entering numerical transaction amounts and information with capital and lowercase letters (e.g. customer addresses) where required.
c. Asterisk key - Used for scrolling upwards on the menus, as well as inputting the following characters: *,' ".
d. Cancel key - Cancel current function and return to the idle screen. Also used to power off the terminal when held down for at least 10 seconds.
e. Clear/back key - Clearing entered data or moving back to the previous menu screen.
f. Enter key - Accept data entry or proceed to the next menu screen. Also used to power on the terminal when held down for at least 10 seconds.
g. Hash key - Used for scrolling downwards on the menus.

Powering up
The VX680 terminal will be fully configured on arrival, with a SIM card included.
1. Plug the power cord into the mains electricity and then insert the jack into the power slot on the side of the base unit.
2. The base unit will then show a flashing LED (white) while it boots up. This will then become solidly illuminated.
3. You can now place the V240m card machine onto the base unit.
4. The V240m will start booting up.
5. When boot-up is complete, there should be two LED lights solidly illuminated on the base unit (white and blue).
6. You can now move on to the Basic setup section.
Using the Main Menu
The V240m has a menu-driven interface, where you can choose from a list of options to initiate specific tasks.
- To access the main menu on the V240m, press the key on the touchscreen.
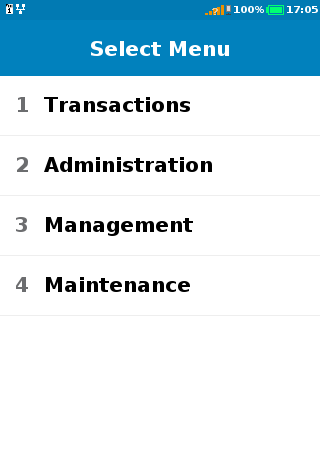
- As a general rule, if the X key is selected, the application will revert back to the main (top level) menu.
- Navigate the menu using the touch screen or keypad. For example, to select Transactions, press this position on the touch screen or press number 3 on the terminal keypad.
Pressing 1 for example, will present the list of transactions supported.
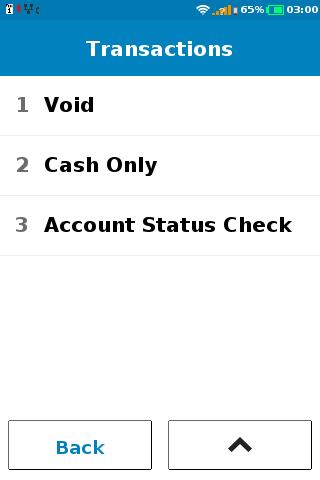
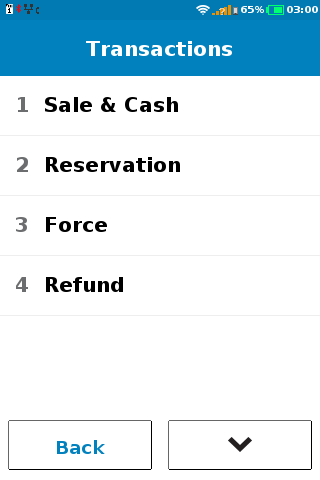
- When the list of items available on the menu is larger than what can be displayed, the page up or page down button will appear and can be touched on screen or operated via the # key for down and the * key for up.
- The back button or < can be pressed to go back one level of the menu.
- Pressing the X key will return to the idle screen.
- Some menu options are password protected and those options will present the following screen:
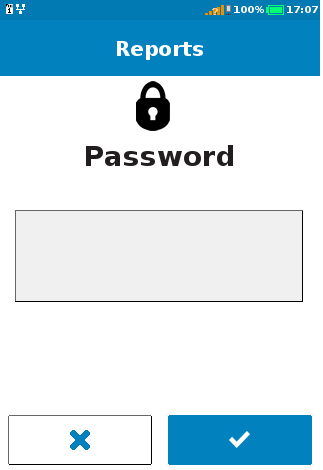
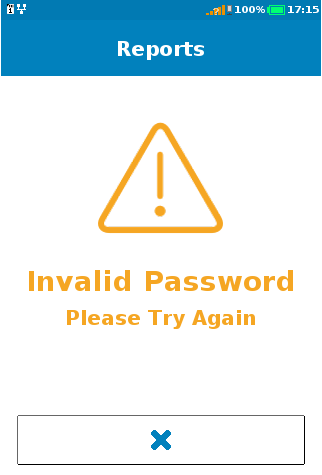
If the incorrect password is entered a warning screen will be displayed.
Connecting GPRS / mobile data
1. Navigate the following sequence of menus by pressing on the idle screen:
Menu > Management > Settings > Communications
2. In the communications panel, check that the network for Mobile Data status is “Up”, if this is the case you are operational and can press the X key to return the main idle screen. If you see “Down” stated against “Mobile Data”, please contact us for support.

Connecting Wi-Fi
1. Navigate the following sequence of menus by pressing on the idle screen: Menu > Management > Settings > Communication
2. Enter password of '123456' (Unless you set your own password at the point of installation).
3. Select WiFi > Configuration > WiFi Scan
4. Select the name of the router you want to use and press Add
5. Select Pre-Shared-Key (PSK)
6. Enter the router password and select OK
7. Select Save > OK > Yes > OK > Status. Status will show as 'Up'.
You will now be able to process transactions over the configured WiFi connection. If you experience any issues, please contact customer support.
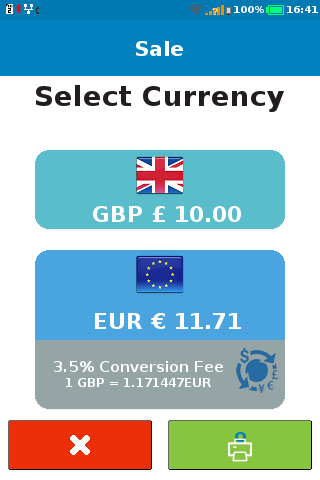
Sale transaction (including contactless & CNP)
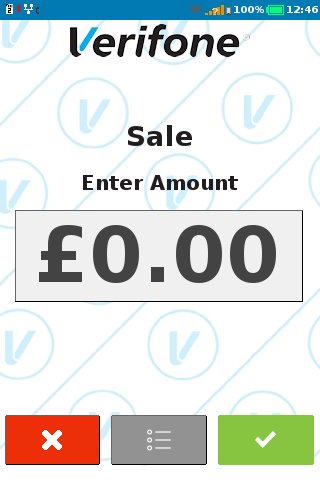
1. The card machine is ready to start a sale transaction from the idle screen. Enter sale amount and then press O key.
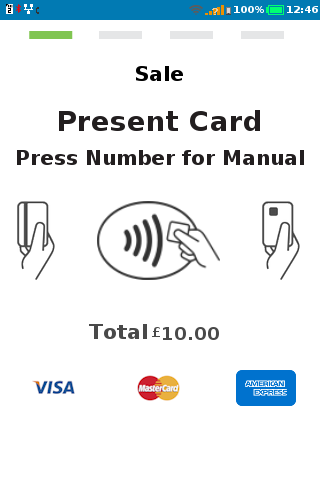
2. Insert the card, swipe, manual key entry or tap contactless card.
For a Customer Not Present (CNP) transaction, which requires the card number to be keyed-in, proceed to step 9.
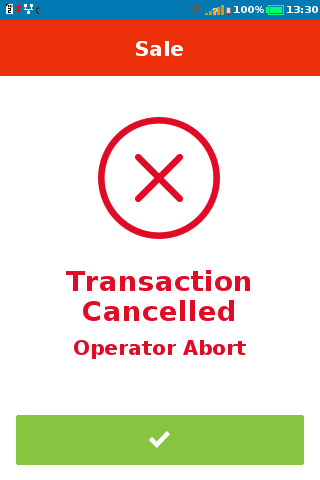
If X key is pressed, proceed to step 15.
3. The terminal connects to the host. If DCC option is available, proceed to step 14.
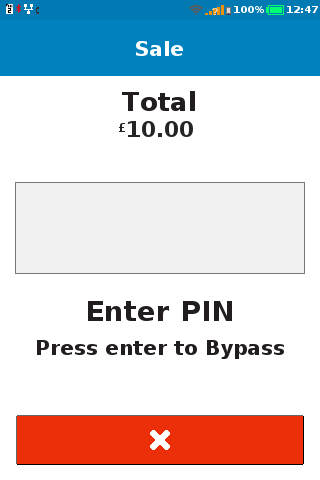
4. Enter PIN and then press O key.
5. The terminal connects to the host.
6. The terminal has received approval response from the host and printing the receipt. If signature verification identified as the verification method proceed to step 13.

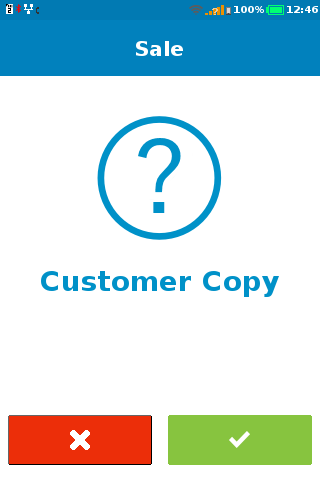
7. Press the O key to print a customer copy.
If not required press the X key, to revert to the idle screen.
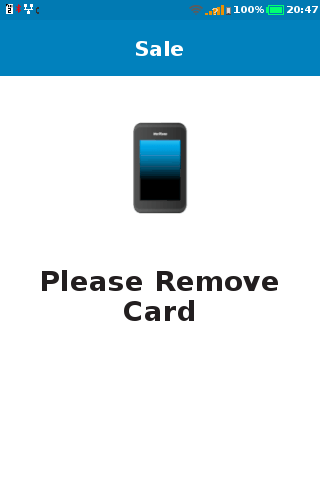
8. The terminal prompts user to remove the card before going back to idle screen.
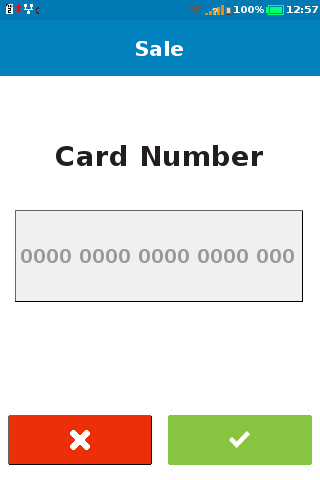
9. Begin typing the card number on the payment options screen. The screen will switch to manual entry screen. Once the long card number is complete, press the O key to continue.
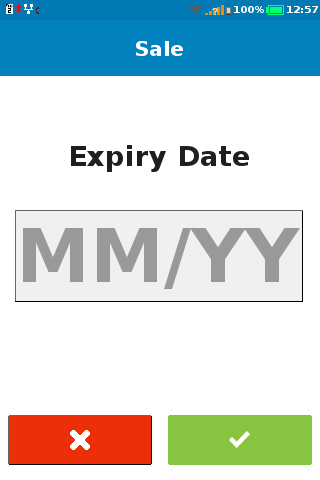
10. Enter the expiration date of card and then press O key.
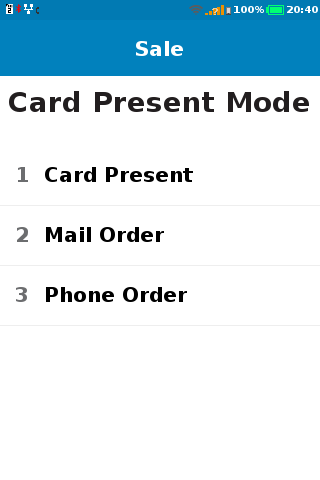
11. Select the Card Present Mode.
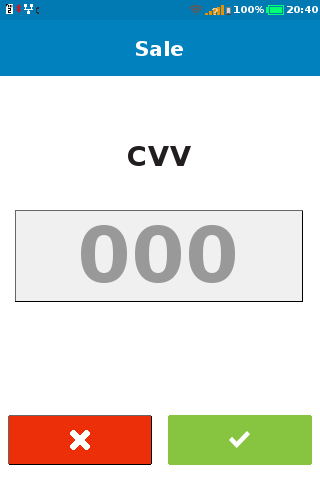
12. Enter CVV number and then press O key.
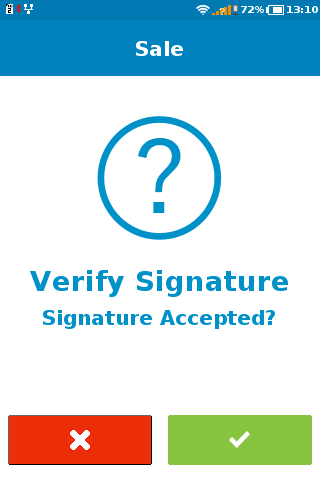
13. The cardholder is required to sign on the merchant copy of the printed receipt.
The signature is verified by the Merchant, press O key to confirm the signature. Revert to step 7.
If X key is selected terminal voided this transaction.
14. Terminal displayed DCC currency selection. The purchase price is converted from the Merchant’s pricing currency into the cardholder’s billing currency. The conversion rate is shown.
Revert to step 4.
15. Transaction has been cancelled, revert to idle screen.
Note: It's advisable to make a £0.01 transaction on your personal card to ensure setup has been successful. The test transaction must be made by inserting your card and entering your PIN, not a contactless transaction.

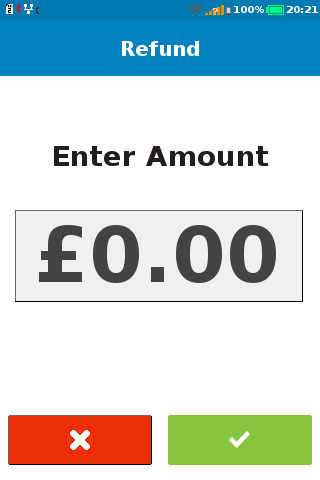
Refund transaction
1. Navigate the following sequence of menus by pressing on the main menu:
Menu > Transactions > Refund
2. Enter Refund amount and then press O key to confirm.
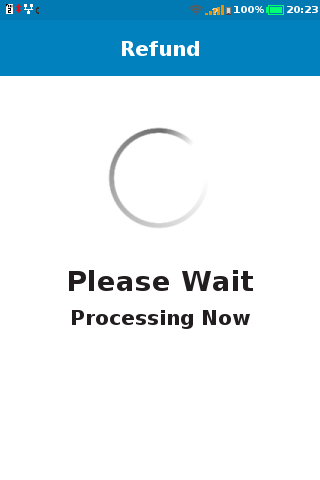
3. Present, insert, swipe or key-in the card number of the payment card.
4. The standard flow is performed (connecting, authorising, PIN/signature, approved, printing).
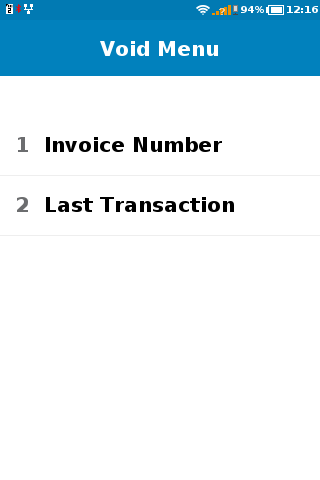
Void
1. Navigate the following sequence of menus by pressing O on the idle screen:
Menu > Transactions > Void
2. Select one of the two options. If Last Transaction is selected the last transaction recorded in the batch will be void, proceed to step 4.
If Invoice Number is selected proceed to the next step.
3. Enter invoice number of the transaction to be cancelled.
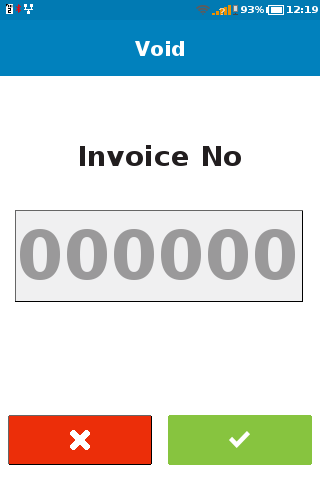
4. Terminal displays information of parent transaction. Verify the information displayed and press O key to proceed or X to cancel.

5. The terminal connects to the host. When the terminal has received an approval response it will print the receipt.
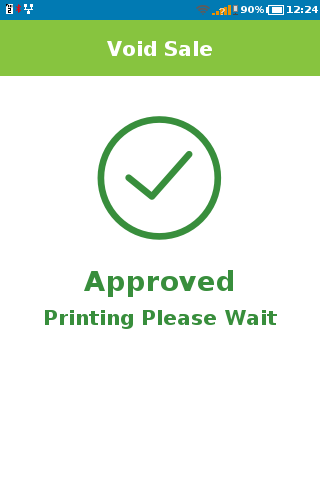
6. Press the O key to print a customer copy. If not required, press the X key to return to the idle screen.
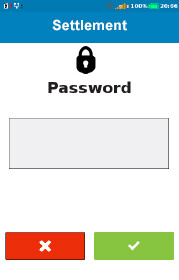
End of day report (Batching)
1. Navigate the following sequence of menus by pressing on the idle screen: Menu > Administration > Batch > Settlement
2. Using the number keys, enter the default password of '123456' (unless you have previously changed this) and press O.
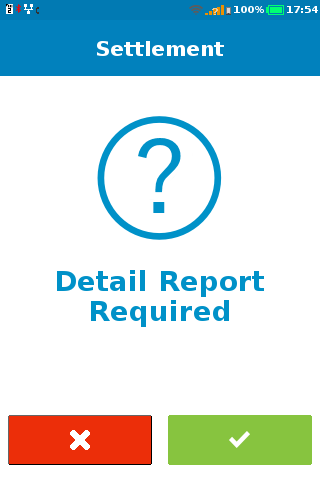
3. The Detail report is required. Press O to proceed.
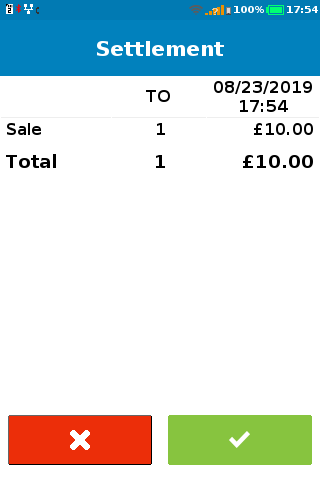
4. Your Detail report will print and a second a screen will be displayed, listing all the performed transactions. Press O to complete your End of Day report.
Note: For security purposes, the screen above will only be displayed for a limited time.
If you do not press O before this screen times out, your End of Day report will not be confirmed.
5. Only when your End of Day report has been successful, will the following screen will be displayed:

The End of Day report will print and state 'SETTLEMENT SUCCESSFUL' at the bottom of the receipt.
Important
End-of-Day-Banking should be performed every day as this is your confirmation of the transaction totals that have been sent to the acquirer.
Batching timescales
Once you’ve completed your End of Day banking report, it will be sent to the acquiring bank to be processed and paid into your bank account. The settlement timescales are as follows:
Standard settlement
2-3 working days
Same Day Settlement
Batch Time
11.01 pm - 4.00 am
4.01 am - 3.00 pm
3.01 pm - 11.00 pm
Funds Received
Before 11.00 am start of business
Before 7.00 pm same day
Before 11.00 am next day
If you would like Same Day Settlement added to your account or are unsure if you have it, please contact our Customer Support team.
Auto end of day report
Also known as ‘auto-batching’, this enables your card machine to bank the transactions listed on your End of Day report at a set time each day. You can choose a specific hour in the day when this is performed e.g. 17.00-18.00 daily.
The batching timescales for receiving funds are the same as if you ran your End of Day report manually:
Standard settlement
2-3 working days
Same Day Settlement
Batch Time
11.01 pm - 4.00 am
4.01 am - 3.00 pm
3.01 pm - 11.00 pm
Funds Received
Before 11.00 am start of business
Before 7.00 pm same day
Before 11.00 am next day
Your card machine will not be pre-programmed with this function but setup can be requested by contacting our Customer Support team.
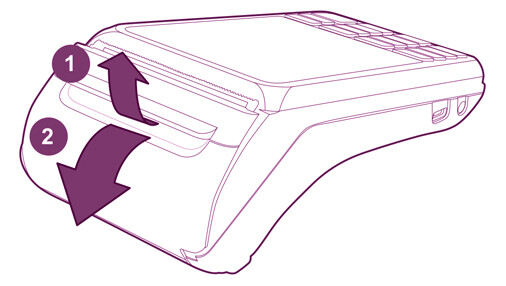
Replacing the paper roll
Use the following steps to load a roll of 57mm x 40mm thermal printer paper into the compartment.
1. Unlock the paper compartment by pulling up the latch and swinging the door downwards.
2. Load the paper roll as shown below, with the edge of the paper on the top of the roll.
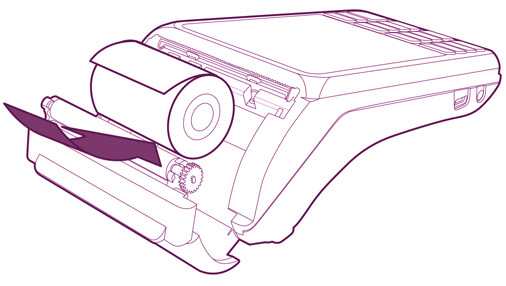
3. Pull a length of paper up over the serrated cutter and close the compartment door.

Customer support
If you have any questions regarding your terminal, please get in contact with our team of experts below:
For authorisation issues outside of our working hours call the Elavon Authorisation Line on:
0345 850 0197 (UK)
1850 303 130 (ROI)
Flexible payment solutions for small businesses