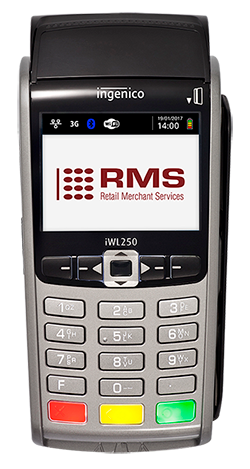
Ingenico iWL251 countertop card machine (Elavon)
-
-
Mobile card machine with SIM card & GPRS connection
-
Take card payments on the road or anywhere with mobile network
-
Ideal for mobile businesses or traders without access to a permanent connection point
-
Get Started
Before you begin
Ensure you have the following items included with your terminal:
- 1x iWL251 card machine
- 1x charging base unit
- 1x power cord
- 1 x supervisor card
You will also need the following information:
- Merchant ID Number: This is the “MID NUMBER” that you can find on any Retail Merchant Services correspondence or email communication.
Connecting
1. Place the terminal within the Base Unit.
2. Plug the Power Cord into the Base Unit.
3. Plug the Power Plug into an electrical socket. A blue ‘:-)’ symbol will then appear on screen.
Note: Ensure your terminal is fully charged before beginning the setup process.
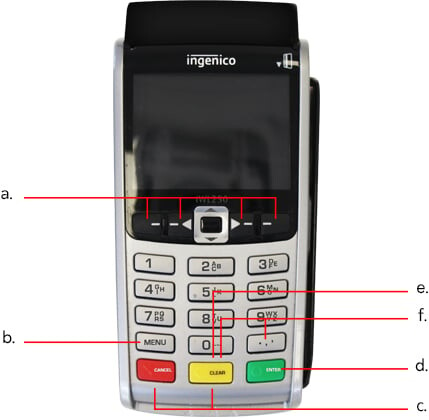
Function & menu keys
a. F1-F4 Keys - Function keys enable scrolling up and down through menus.
b. Menu Key - To enter the application menus, press the MENU key from the READY prompt. Pressing this key again moves to the next menu (if available).
c. Correction Keys - When entering numbers or letters, the yellow CLEAR button deletes one character at a time, whilst the red CANCEL button deletes the entire line (this key also cancels transactions).
d. Confirmation Key - The green ENTER button is used to confirm anything that has been typed into the terminal.
e. Paper Feed - To test the feeding of the paper through the printer, press and hold CLEAR.
f. Reboot Terminal - To reboot the terminal hold down CLEAR and ‘ . ,’ ’ simultaneously.
Setting up
1. Switch on the terminal by holding down ENTER.
2. You will now be prompted to enter your Merchant ID Number. Key in your MID Number and press ENTER. A download will then begin.
3. Once you have successfully installed your Terminal the MID Number will be displayed on screen. You are now ready to start taking card payments.
4. Make a 1p transaction on your personal card to ensure the setup has been successful. Follow the steps in Sale transaction section to do this.
Note: This test transaction must be made by inserting your card and entering your PIN, not a contactless transaction.
Sale transaction
1. A sale transaction may be initiated from the READY prompt (your MID Number will also be displayed) by keying in the transaction amount and pressing ENTER.
2. Follow the terminal prompts to Insert/Swipe/ Present the customer’s card.
Note: You will only be given the option to present the customer’s card if the transaction value is below the maximum Contactless payment limit.
3. Insert/Swipe/Present the customer’s card using the terminal or alternatively key in the card number on the terminal. The customer must enter their PIN code if requested.
Important: Never ask the customer to divulge their PIN. The terminal will now reach the acquirer for authorisation.
4. If the transaction is authorised then an ‘Auth Code’ will be displayed and printed on the receipt.
5. The terminal will print two receipts. The Customer Copy will be printed first, then once you press ENTER the Merchant Copy will be printed.
Contactless sale
1. From the READY prompt enter the sale amount for the transaction and press ENTER.
2. A contactless symbol will be displayed if the amount entered is below the maximum contactless limit.
3. The cardholder should present their card over the contactless symbol on the terminal display. The terminal will then print the Merchant receipt.
4. If the customer requests a receipt, this must be done before the next transaction takes place. From the idle screen, press the decimal point key to print a customer receipt.
Refund transaction
1. From the READY prompt, press the MENU button, then F2 until REFUND is highlighted and press ENTER.
2. Key in the refund amount and press ENTER.
3. Swipe the Supervisor Card. Then insert or swipe the customer’s card.
4. The terminal will dial out to the acquirer for authorisation. If the refund is authorised then REFUND ACCEPTED will be shown.
5. The terminal will print the merchant copy which the customer must sign.
6. Remove the card.
7. Check the signature on the merchant copy with that on the card. If the signature is valid, press ENTER, otherwise press CLEAR. The terminal will then print the customer copy.
Customer not present (CNP) transaction
A payment made where the cardholder does not, or physically cannot, present their card to you at the time of purchase.
1. When prompted with the 'Merchant ID' screen, press MENU.
2. Select either Sale or Refund (depending on what you want to process).
3. Enter the Sale or Refund amount, then press ENTER.
4. When prompted to 'present, key in or insert the card', type the long card number into the card machine using the number keys.
5. Key in the Expiry Date. The format for this will be MM / YY. Then press the ENTER.
6. Key in the customer's address. This will only be the 1st line of the address and a house or flat number.
Note: If the customer doesn’t have a house / flat number, you will just press ENTER to get to the next step.
7. Key in the customer’s postcode. You can only enter the numbers of the postcode in order of how the postcode reads: E.g. if the postcode is 'MK9 1NJ', you would enter '91'. Then press ENTER.
If your business takes a lot of CNP transactions, you may find a Virtual Terminal to be a more useful method of taking payment.
End of day report
1. To access the reports menu press the MENU button until the System Menu is displayed.
2. Press ENTER to select Totals. End-of-Day-Banking will be highlighted; press ENTER to select.
3. Swipe your supervisor card. Follow the display prompts or refer to the User Guide: www.ingenico.co.uk/userguides
4. The terminal will either go online to the acquirer to confirm the totals before printing the report, or will print out a report showing the totals.
End-of-Day-Banking should be performed every day as this is your confirmation of the transaction totals that have been sent to the acquirer.
Supervisor Card
You will find your Supervisor card located in the delivery box, on the underside of the lid.
Batching timescales
Once you’ve completed your End of Day banking report, it will be sent to the acquiring bank to be processed and paid into your bank account. The settlement timescales are as follows:
Standard settlement
2-3 working days
Same Day Settlement
Batch Time
11.01 pm - 4.00 am
4.01 am - 3.00 pm
3.01 pm - 11.00 pm
Funds Received
Before 11.00 am start of business
Before 7.00 pm same day
Before 11.00 am next day
If you would like Same Day Settlement added to your account or are unsure if you have it, please contact our Customer Support team.
Auto end of day report
Also known as ‘auto-batching’, this enables your card machine to bank the transactions listed on your End of Day report at a set time each day. You can choose a specific hour in the day when this is performed e.g. 17.00-18.00 daily.
The batching timescales for receiving funds are the same as if you ran your End of Day report manually:
Standard settlement
2-3 working days
Same Day Settlement
Batch Time
11.01 pm - 4.00 am
4.01 am - 3.00 pm
3.01 pm - 11.00 pm
Funds Received
Before 11.00 am start of business
Before 7.00 pm same day
Before 11.00 am next day
Your card machine will not be pre-programmed with this function but setup can be requested by contacting our Customer Support team.
X and Z reports
These reports allow you to print out a statement of which transactions have been made on your card machine regardless of your End of Day report being run or not.
This feature is typically used by businesses that operate by shift work. E.g. you may be a restaurant that opens for a separate lunch and dinner sitting and want to know how much is taken in each sitting.
X report – ‘Mid shift’
The X report is intended to be mid-shift snapshot of what has transacted on the card machine from the beginning of the shift until the present moment.
-
- Prints out every transaction that has or hasn’t been batched.
- The totals will remain on the card machine.
Z report – ‘End shift’
The Z report is intended to be an overview of the card machine’s entire shift from open to close.
-
- Prints out every transaction that has or hasn’t been batched.
- The totals on the card machine will be reset to zero.
Note: This will not remove the totals from the End of Day report. For both X & Z reports you will still need to run your End of Day report in order to receive your funds.
Your card machine will not be pre-programmed with this function but can be requested by contacting our Customer Support team.
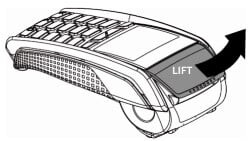
Replacing the paper roll
1. Hold the terminal firmly.
2. Open the paper roll compartment by hooking your fingertips under the flap at the rear of the terminal and gently lift away from the terminal body.
3. Remove the paper roll or used spool from the compartment.
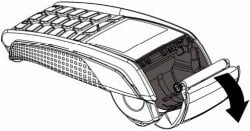
4. Unwrap the silver foil from the paper roll or unstick the end of the paper roll if it is not wrapped in foil.
5. Place the paper roll into the compartment with the loop at the bottom.
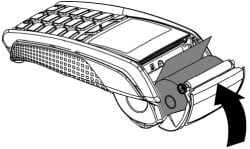
6. Ensure that the paper roll end is at the front of the compartment.
7. Lift the compartment lid forward whilst holding the top of the paper roll.
8. Ensure that the paper roll end is outside the compartment and gently close the lid trapping the paper roll between the rollers.
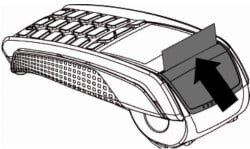
9. While on the idle screen press and hold the CLEAR button to ensure that the paper feeds correctly.
Customer support
If you have any questions regarding your terminal, please get in contact with our team of experts below:
For authorisation issues outside of our working hours call the Elavon Authorisation Line on:
0345 850 0197 (UK)
1850 303 130 (ROI)
Flexible payment solutions for small businesses